
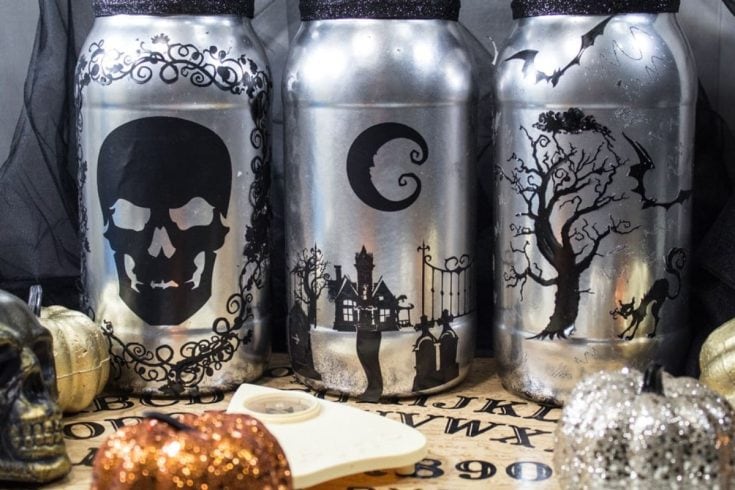
Learn how to make DIY Halloween Lanterns using upcycled pickle jars, spray paint, and your Cricut machine. This easy Halloween craft is budget-friendly, spooky, and perfect for adding festive light to your porch, windows, or party table.

This post sharing how to make DIY Halloween Lanterns contains affiliate links. That means that if you make a purchase after clicking a link, I will receive a small portion of the sale at no additional cost to you.
Why You’ll Love These DIY Halloween Lanterns
- Budget-friendly – reuse old pickle jars or any glass jars you already have.
- Cricut craft – includes free Halloween cut files for vinyl stickers made with a Cricut.
- Customizable – choose spooky images, colors, and light sources to match your Halloween décor.
- Eco-friendly – repurpose jars instead of throwing them away.
Supplies You’ll Need
- Glass jars (pickle jars, mason jars, or recycled pasta sauce jars)
- Cricut machine + vinyl (black or holographic works great)
- Halloween cut files (download free at the bottom of this post)
- Spray paint (chrome, black, orange, or glow-in-the-dark)
- Weeding tools
- Ribbon or twine for finishing touches
- Battery-operated tea lights, LED candles, or fairy lights
Step-by-Step: How to Make DIY Halloween Lanterns
1. Prep Your Jars
Wash and dry your jars thoroughly. Remove labels and sticky residue so the paint adheres properly.
2. Cut Your Halloween Designs
Upload the free cut files into Cricut Design Space, scroll down to find my premade cut files for your Cricut machine. Cut out your spooky vinyl designs—think bats, pumpkins, ghosts, or spiderwebs.
3. Apply Vinyl Stickers or Stencils
You can use vinyl as a permanent design or as a stencil to create clear windows for the light to shine through.
👉 Pro Tip: Apply the stencil before spray painting for a crisp, transparent section that glows when lit.

4. Spray Paint the Jars
Choose your color! Chrome and black look eerie and dramatic, while orange or glow-in-the-dark give a classic Halloween vibe. Spray in thin coats for even coverage.

5. Add Light Details
If the paint feels too heavy, use weeding tools to scratch out lightning bolts or small designs. This lets more light escape for a magical shimmering effect.

6. Finish & Light Up
Wrap ribbon or twine around the jar top, add your light source, and place the lanterns on a mantel, porch, or party table.
Ideas for Variations
- Glow in the Dark Halloween Lanterns – use glow paint for an extra spooky effect.
- Mason Jar Ghost Lanterns – paint jars white and use black vinyl eyes/mouths.
- Pumpkin Lanterns – orange paint + jack-o-lantern cut file.

Free Halloween Cricut Cut Files
Get your free downloads here:
🎃Cut File 1 – Jack-O-Lantern Face
👻Cut File 2 – Ghost Silhouette
🕷️Cut File 3 – Spider & Web

DIY Halloween Lantern FAQs
What kind of lights work best in DIY lanterns?
Battery-operated LED tea lights or fairy lights are safest. Avoid real candles unless jars are heat-safe and supervised.
Can I make these without a Cricut?
Yes! Use stickers, washi tape, or hand-cut shapes with painter’s tape as stencils.
How long do they last?
With battery lights, they can be reused year after year. Just refresh the paint if it chips.
Final Tips for this Easy DIY
DIY Halloween Lanterns are a simple, affordable way to add a spooky glow to your Halloween décor. Whether you’re using them for a porch display, party table centerpiece, or trick-or-treat night, these glowing jars are sure to impress.
✨ Don’t forget to pin this project to your Halloween Crafts board and share your creations with me in the comments!
More Easy Crafts & DIY Inspiration
Check out some of my other easy crafts and simple DIY projects for the home.
- DIY Milk Carton Bird Feeder With Upcycled Mirrors
- DIY European Mount
- How to Make a Faux Tiffany Style Lamp Shade
- Easy DIY Faux Cactus Decor
- How to Upcycle Cardboard Box into a Decorative Tray
- How to Melt Crayons in Silicone Molds
DIY Halloween Lanterns
Learn how to make DIY Halloween Lanterns with Cricut and upcycled jars. Easy step-by-step tutorial with free cut files for Halloween décor!
Materials
- Glass jars (pickle jars, mason jars, or recycled pasta sauce jars)
- Halloween cut files (download free at the bottom of this post)
- Spray paint (chrome, black, orange, or glow-in-the-dark)
- Ribbon or twine for finishing touches
- Battery-operated tea lights, LED candles, or fairy lights
Tools
- Cricut machine + vinyl (black or holographic works great)
- Weeding tools
Instructions
Start by prepping your jars. Wash them thoroughly, peel off the labels, and remove any sticky residue so the paint adheres properly. Once they’re clean and dry, upload the free Halloween cut files into Cricut Design Space and cut out your favorite spooky vinyl designs—bats, pumpkins, ghosts, or spiderwebs all work perfectly.
Apply the vinyl to the jars, either as a permanent design or as a stencil to leave a clear “window” for light to shine through.
Next, spray paint the jars in thin, even coats. Chrome and black give a dark, eerie look, while orange or glow-in-the-dark paint creates a more traditional Halloween vibe. If the paint comes out a bit too heavy, use weeding tools to scratch out small shapes like lightning bolts—this adds detail and lets more light escape for a magical shimmering effect.
Once the paint is dry, finish your lanterns with ribbon or twine around the jar tops, then add LED tea lights, fairy lights, or battery-operated candles inside. Place them on a porch, mantel, or party table and enjoy the spooky glow!
Notes
👉 Pro Tip: placing the stencil before spray painting gives you a crisp, transparent section that glows beautifully when lit.
As an avid gardener, dedicated homemaker, and culinary enthusiast, I bring a wealth of knowledge and passion to every aspect of homemaking, recipes, travel, and gardening. My journey is deeply rooted in a love for nature, food, and exploration, which I share through my engaging content.
With years of experience cultivating a vibrant garden and crafting delicious recipes, I specialize in creating farm-to-table homestyle dishes that highlight the freshest ingredients. My culinary creations are inspired by my extensive travels, allowing me to infuse a variety of flavors from my travels into my kitchen.
Through my blog, I aim to inspire others with practical gardening tips, mouth-watering recipes, and unique travel experiences. Whether you're looking for garden-to-plate cooking ideas, copycat recipes, or advice on homemaking, I provide a trusted source of information and inspiration.
Join me as I blend the joys of gardening, cooking, and travel into a harmonious lifestyle, offering readers a well-rounded perspective on how to bring these passions into their own homes.
Eh man, ju know deese jars are super spooky ese! Quiero para el dia de los muertes!